


Are you tired of buying dehydrated mangoes from the store, which are often loaded with preservatives and artificial sweeteners? Why not try dehydrating your own mangoes at home using just your oven?
How to dehydrate mango in oven is a simple and effective way to preserve this tropical fruit, allowing you to enjoy its sweet and tangy flavor year-round. The process involves slowly removing the moisture content from mango slices, which not only extends their shelf life but also intensifies their natural sweetness. Oven-dried mango slices make a delicious and healthy snack used in various recipes or as a convenient on-the-go treat.
With just a few easy steps, you can create your very own batch of these delectable dried fruits using standard kitchen equipment.
What Will You Need?
To get started, you will need the following items:
- Ripe mangoes
- Sharp knife
- Cutting board
- Oven
- Baking sheet or tray
- Parchment paper or silicone baking mat
- Cooling rack (optional)
Once you have gathered all the necessary items, it’s time to prepare the mangoes for dehydration.
10 Easy Steps on How to Dehydrate Mango in Oven
Step 1. Preheat the Oven:
Start by preheating your oven to a temperature of 185°F (85°C). If your oven doesn’t have this exact setting, use the lowest possible temperature your oven allows. Preheating ensures that the oven reaches a steady temperature before you place the mango slices inside. Not rushing this step is crucial, as a consistent temperature facilitates even dehydration, preventing scorching or under-drying. While the oven is preheating, you can use this time to prepare your mangoes—proper preheating aids in maintaining the mango’s vibrant color and potent flavor throughout the drying process. Keep in mind that patience is vital to achieving perfectly dehydrated mango slices.
Step 2. Prepare the Mangoes:
Begin by thoroughly washing the mangoes under running water to remove dirt or pesticides from the skin. Once cleaned, use a sharp knife to peel the mangoes and remove the skin. Carefully slice the mangoes into uniform pieces, about 1/4-inch thick. Consistent thickness ensures that all slices dehydrate evenly at the same rate. Be cautious while cutting around the pit, and aim to maximize the amount of fruit in each slice. If desired, you can cut the slices into smaller, bite-sized pieces, which can be more convenient for snacking later. As you proceed, arrange the slices in a single layer on a cutting board or plate, ready to be transferred to the baking sheet or tray.

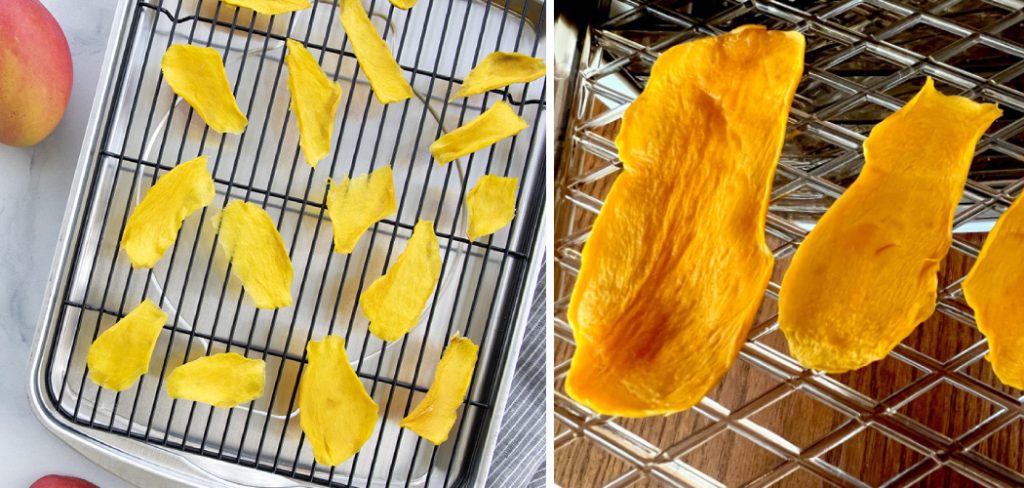
Step 3. Arrange the Mango Slices on the Baking Sheet:
Line a baking sheet or tray with parchment paper or a silicone baking mat to prevent the mango slices from sticking. Carefully place the mango slices in a single layer on the prepared baking sheet, ensuring that no pieces overlap. Proper spacing is essential as warm air circulates around each slice, promoting uniform dehydration. If you have more slices than can fit comfortably in a single layer, consider using a second baking sheet or drying the mangoes in batches to maintain even drying conditions.
Step 4. Place the Baking Sheet in the Oven:
Once the mango slices are arranged on the baking sheet, carefully place them in the preheated oven. Position the sheet in the middle rack to ensure even heat distribution. Avoid opening the oven door frequently; this will let out heat and slow the dehydration process. However, it can be helpful to rotate the baking sheet halfway through the drying time to promote uniform drying. Depending on the thickness of the mango slices and the temperature of your oven, the dehydration process can take anywhere from 2 to 4 hours. Keep a close eye on the mango slices as they dry, looking for a leathery texture, which indicates that they are adequately dehydrated but still slightly pliable.

Step 5. Check for Doneness:
Check for doneness after the mango slices have been in the oven for about 2 to 4 hours. Properly dehydrated mango slices should have a leathery texture and feel dry to the touch, yet they should be smooth. They may still be slightly pliable but should not be sticky or leave moisture on your fingers. If the slices are not dry enough, allow them more time in the oven, checking every 20 to 30 minutes. The drying time can vary based on factors such as slice thickness, oven temperature, and the initial moisture content of the mangoes. Patience is essential to ensure that the mango slices are thoroughly dehydrated and safe for long-term storage.
Step 6. Cool the Mango Slices:
Once the mango slices have reached the desired level of dehydration, carefully remove the baking sheet from the oven. Allow the slices to cool on the baking sheet for 15 to 20 minutes. This cooling period helps stabilize their texture and further reduces any residual moisture. If you have a cooling rack, you can transfer the slices onto it to cool more efficiently, allowing air to circulate around the entire piece. Proper cooling is vital to prevent the slices from becoming mushy when stored.
Step 7. Store the Mango Slices:
After the mango slices have cooled completely, it’s time to store them properly to maintain their quality and freshness. Place the dehydrated slices in an airtight container or resealable plastic bag. For best results, use vacuum-sealed bags or jars with airtight lids to further extend their shelf life by protecting them from moisture and oxygen. Store the container in a cool, dark, and dry location, such as a pantry or cupboard. Avoid exposing the mango slices to direct sunlight or extreme temperature fluctuations, as these can degrade their texture and flavor over time.
Step 8. Enjoy Your Homemade Dried Mangoes:
Now that you’ve successfully dehydrated and stored your mango slices, it’s time to enjoy them! These homemade dried mangoes make for a delicious, healthy snack packed with natural sugars and essential nutrients. They can be enjoyed independently or added to cereals, yogurt, or trail mixes for a flavorful boost. Their compact form makes them an ideal snack for travel or on-the-go situations. Share them with family and friends to showcase your homemade culinary skills, or keep them all to yourself as a rewarding treat.

Step 9. Explore Variations and Flavor Enhancements:
Once you’ve mastered the basic technique of dehydrating mangoes, consider experimenting with different flavors and variations to elevate your homemade treats. You can sprinkle chili powder or a pinch of salt on the mango slices before drying them for a sweet and spicy combo. Alternatively, dip the slices in a mixture of lemon or lime juice and honey to add a zesty twist. You can also incorporate other fruits, such as pineapple or kiwi, to create a tropical mix, or pair the mangoes with nuts and seeds for a wholesome snack.
Step 10. Use in Creative Recipes:
Your homemade dried mangoes aren’t just delicious; they can be a versatile ingredient in various recipes. Consider incorporating them into baked goods like muffins or bread for a burst of flavor. They can also be rehydrated and used in savory dishes, such as adding them to sauces or curries for a hint of sweetness. For a refreshing twist, use them in homemade energy bars or smoothies. The possibilities are endless, so don’t hesitate to experiment and bring a touch of your creativity into the kitchen with these delightful dried mango slices.
By following these simple steps, you can quickly transform fresh mangoes into a delicious and nutritious snack that will satisfy your craving for sweetness while providing essential vitamins and minerals.
5 Things You Should Avoid
- Using Unripe Mangoes: Unripe mangoes lack the natural sweetness and full flavor that ripe mangoes offer. This can result in dehydrated mangoes that are tart and not as enjoyable.
- Failing to Slice Evenly: Consistent thickness in mango slices ensures even dehydration. Uneven slices might make some pieces over-dried and chewy, while others remain too moist.
- Skipping Pre-Treatment: Before dehydrating, it’s beneficial to soak mango slices in lemon juice or a similar acidic solution. This step helps preserve the fruit’s color and flavor, preventing browning and enhancing taste.
- Setting the Wrong Temperature: Dehydrating mangoes at too high can lead to burning or hard, brittle textures. For optimum dehydration, it’s crucial to maintain an oven temperature around 135°F to 145°F.
- Inadequate Cooling and Storage: Once dehydrated, mango slices should be thoroughly cooled at room temperature before storage. Failing to cool them properly can trap moisture, leading to spoilage.

Conclusion
How to dehydrate mango in oven is a straightforward process that requires attention to detail and adherence to certain steps to ensure the best results.
By selecting ripe mangoes, slicing them evenly, and pre-treating them with an acidic solution, the fruit’s natural sweetness and vibrant color can be preserved. Maintaining the correct temperature is crucial to achieving a perfectly dehydrated product and avoiding over-drying or under-dehydration. Equally important is the cooling and storage process, which prevents moisture retention and ensures the longevity of the dehydrated mango slices.
By following these guidelines, you can produce delicious, homemade dried mangoes, perfect for snacking or adding to your favorite recipes.
Professional Focus
Angela Ervin, a former interior designer turned blogger, specializes in kitchen design and renovations. Through her website, she blends her passion for cooking with design expertise, sharing practical and creative ideas. Known for balancing functionality and beauty, Angela’s insightful content has made her a trusted voice in home design and lifestyle.
About the Author
Angela Ervin, an experienced interior designer and blogger, combines her passion for kitchen renovations with storytelling. Living in Petersburg with her family, she enjoys cooking and testing her projects firsthand. Known for her humor and relatable style, Angela shares creative, functional design insights through her content, making her a trusted voice in home design.
Education History
University: Virginia Commonwealth University
Degree: Bachelor of Fine Arts (BFA) in Interior Design
- Angela’s education at VCU focused on mastering core interior design principles, including spatial planning, color theory, materials selection, and sustainable design practices.
- She gained hands-on experience through studio projects and collaborative design exercises, which honed her ability to create functional and aesthetically pleasing environments.
- Her coursework also emphasized problem-solving and practical applications of design, preparing her for real-world projects like her self-directed kitchen renovations.
- The program’s strong foundation in both technical skills and creative expression shaped Angela’s ability to seamlessly integrate form and function in her work.