


Reupholstering kitchen chairs is an effective way to refresh the look of your dining space without the need for a complete furniture replacement. This cost-effective and creative project allows you to customize the fabric to match your decor and personal style.
Whether your chairs are worn out, damaged, or simply in need of a new aesthetic, reupholstering can breathe new life into them. With the right tools and materials, even beginners can embark on this DIY project, transforming their kitchen chairs into stunning focal points of the room.
In this blog post on how do you reupholster kitchen chairs, we will guide you through the step-by-step process of reupholstering your chairs.

Why Reupholster?
Reupholstering your kitchen chairs provides numerous benefits beyond just aesthetics. Firstly, it can significantly extend the life of your furniture, helping you avoid the cost of buying new chairs. This process also allows you to repair any structural issues, such as loose joints or weakened frames, ensuring your chairs remain functional and safe to use.
Additionally, by choosing new fabric, you have the opportunity to infuse your space with fresh colors, patterns, or textures that align with current trends or your evolving tastes. This customization not only enhances the visual appeal of your dining area but also reflects your unique personality, making meals even more enjoyable.
Lastly, reupholstering is an eco-friendly option as it reduces waste by repurposing existing furniture instead of buying new pieces.
What You Need
Before getting started, gather all the necessary tools and materials for the job. These include:
Screwdriver or Drill:
To remove the existing fabric and any staples or screws holding it in place, you will need to use a screwdriver or drill.
Staple Gun:
A staple gun is essential for securing the new fabric onto your chairs. Make sure to choose one suitable for upholstery.
Fabric:
Choose a durable and easy-to-clean fabric that complements your decor. Consider the material’s weight, color, and pattern to achieve the desired look.
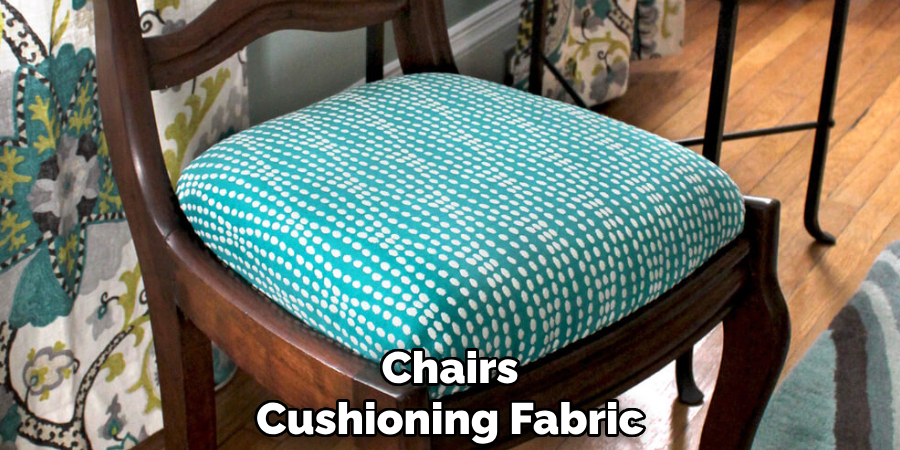
Cushioning:
For added comfort, you can add a layer of cushioning, such as foam, between the fabric and chair frame.
8 Step-by-step Guides on How Do You Reupholster Kitchen Chairs
Step 1: Prepare Your Workspace
Before you begin the re-upholstering process, it is crucial to set up a well-organized and clean workspace. Choose a spacious area with plenty of light to ensure you can see your work clearly. Lay down a protective sheet or drop cloth to avoid any potential damage to floors or carpets from stray staples or fabric scraps.
Gather all your tools and materials, including a screwdriver, staple gun, fabric, and cushioning, and arrange them neatly around your workspace for easy access. Having everything prepared and within reach will streamline the process and help maintain focus as you work through each step of the project.
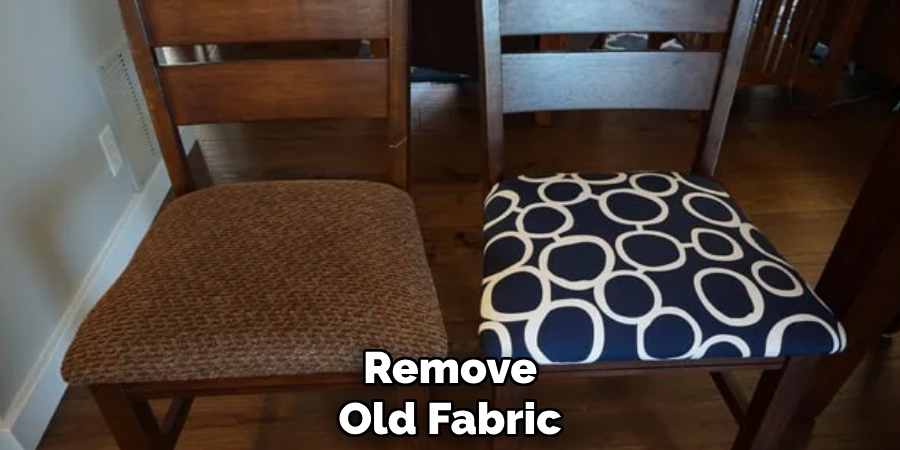
Step 2: Remove the Old Fabric and Cushioning
Begin by turning your chair upside down to locate and access the screws or staples that are securing the seat to the chair frame. Using a screwdriver or drill, carefully remove the screws to detach the seat from the frame. Set the frame aside as you focus on the seat. If the fabric is held with staples, use a staple remover or the end of a screwdriver to gently pry each staple out, taking care not to damage the wood or cushioning underneath.
Once all the staples are removed, pull away the old fabric, revealing the existing cushioning. If the cushioning appears worn out or damaged, remove it as well to make space for new foam or padding. This process might take some time, but it’s crucial to ensure you have a clean, smooth surface for applying your new materials. Make sure to keep track of any screws or hardware you remove, as you will need them later to reattach the seat to the frame.
Step 3: Measure and Cut Your Fabric
Using your old fabric as a guide, measure the dimensions of your chair seat, adding an extra few inches to each side to ensure you have enough material to work with. This additional allowance will allow you to pull the fabric tautly and neatly secure it without worrying about running out of fabric. Once you have your measurements, lay out your new fabric on a flat surface and cut it accordingly.
If using cushioning, use the same method to measure and cut it slightly smaller than the size of your seat so that it does not stick out from under the fabric once attached.
Step 4: Reattach Cushioning (Optional)
If you have decided to add or replace cushioning for added comfort, this is the moment to do it. Start by placing the cushioning material, such as foam, directly onto the seat base. Ensure it is evenly centered and fits snugly within the boundaries of the seat. This may require some trimming if the foam extends beyond the edges.
For added security, you may wish to use a spray adhesive to attach the cushioning to the seat, preventing it from shifting as you proceed with reupholstering. Once securely in place, lightly press down on the foam to ensure it adheres well and remains level, providing a uniform look and feel under the new fabric.
Step 5: Position and Attach the New Fabric
With your cushioning in place, lay your cut fabric on top of it, making sure it is centered and even on all sides. Pull one side tautly over the edge of the seat base and use a staple gun to secure it in place. Repeat this process with each of the remaining sides, pulling tightly as you go to avoid any wrinkles or sagging in the fabric.
As you reach corners or curves, gently fold and tuck the fabric to create neat, tailored edges. Continue stapling until all sides are attached securely.
Step 6: Create a Finished Look
To ensure a professional-looking finish, trim any excess fabric and staple ends. If desired, you can also attach a thin layer of cotton batting or lining to the underside of the seat using spray adhesive. This will add an extra layer of cushioning and provide a clean, finished look to your newly reupholstered chair.
The batting or lining should be cut to the same size as your seat, with holes for screw access if necessary. Secure it in place with spray adhesive or by stapling along the edges.
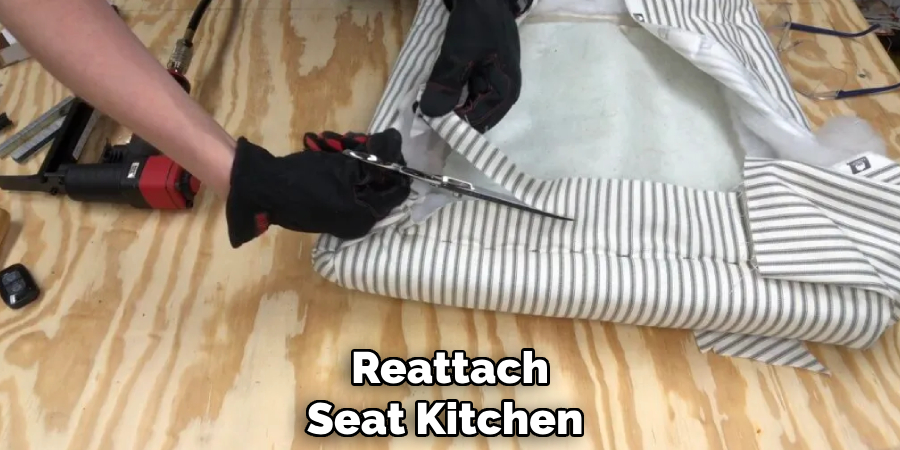
Step 7: Reattach the Seat to the Chair Frame
Now that your seat is fully reupholstered, it’s time to reattach it to the chair frame. Using your screwdriver or drill, align and secure the screws back into their original positions, making sure they are tightly fastened. If any of the screws were damaged during removal, replace them with new ones of similar size and shape.
The new fabric and cushioning should create a snug fit, so be careful not to damage or rip the materials as you reattach the seat.
Step 8: Enjoy Your Newly Reupholstered Kitchen Chairs
Congratulations! You have successfully completed the process of reupholstering your kitchen chairs. Admire your handiwork and enjoy the fresh, updated look of your newly upholstered chairs. Repeat these steps for each chair in your set and revel in the satisfaction of revamping your kitchen decor without breaking the bank.
Following these steps on how do you reupholster kitchen chairs will enable you to reupholster your kitchen chairs efficiently and professionally, giving them a new lease on life for years to come. With practice, you can apply these techniques to other furniture pieces and create a cohesive look throughout your home with beautifully upholstered items. So go ahead, get creative, and give those old chairs a fresh new look! Happy reupholstering!
Frequently Asked Questions
Q: Do I Need to Replace the Cushioning Every Time I Reupholster a Chair?
A: Not necessarily. If the existing cushioning is in good condition, you can reuse it for your reupholstering project. However, if it appears worn out or damaged, it’s a good idea to replace it for added comfort and support.
Q: Can I Use Any Type of Fabric for Reupholstering My Kitchen Chairs?
A: Yes, you can use any type of fabric for your kitchen chairs as long as it is durable and suitable for upholstery. Consider the style and design of your kitchen when selecting fabrics to ensure it complements the overall look of the space.
Q: How Much Fabric Do I Need for Each Chair?
A: The amount of fabric needed will vary depending on the size and shape of your chair seat. As a general rule, add 3-4 inches to each side for a standard dining chair. If you are unsure, it’s always best to purchase a little extra fabric to be safe.
Q: Can I Reupholster Chairs with Armrests?
A: Yes, you can reupholster chairs with armrests following the same steps outlined above. You may need to use additional fabric and take extra care when stapling around the arms to ensure a smooth and seamless finish.
Q: What Tools Do I Need for Reupholstering My Kitchen Chairs?
A: The necessary tools for reupholstering your kitchen chairs include a staple gun, pliers, screwdriver or drill, measuring tape, and scissors. You may also want to have a spray adhesive and extra cushioning on hand for added comfort.
Conclusion
Reupholstering your kitchen chairs is a rewarding project that not only breathes new life into your furniture but also adds a personal touch to your home decor. With the right tools and materials, you can transform worn-out chairs into stylish and comfortable pieces that enhance the ambiance of your dining area. This guide provides a step-by-step approach on how do you reupholster kitchen chairs, ensuring a professional look while maintaining budget-friendly solutions.
Whether you’re a seasoned DIY enthusiast or a beginner, these techniques are accessible and achievable. Embrace the creativity of reupholstering and enjoy the satisfaction of revamping your living space with beautifully updated chairs that reflect your style. Happy decorating!
Professional Focus
Angela Ervin, a former interior designer turned blogger, specializes in kitchen design and renovations. Through her website, she blends her passion for cooking with design expertise, sharing practical and creative ideas. Known for balancing functionality and beauty, Angela’s insightful content has made her a trusted voice in home design and lifestyle.
About the Author
Angela Ervin, an experienced interior designer and blogger, combines her passion for kitchen renovations with storytelling. Living in Petersburg with her family, she enjoys cooking and testing her projects firsthand. Known for her humor and relatable style, Angela shares creative, functional design insights through her content, making her a trusted voice in home design.
Education History
University: Virginia Commonwealth University
Degree: Bachelor of Fine Arts (BFA) in Interior Design
- Angela’s education at VCU focused on mastering core interior design principles, including spatial planning, color theory, materials selection, and sustainable design practices.
- She gained hands-on experience through studio projects and collaborative design exercises, which honed her ability to create functional and aesthetically pleasing environments.
- Her coursework also emphasized problem-solving and practical applications of design, preparing her for real-world projects like her self-directed kitchen renovations.
- The program’s strong foundation in both technical skills and creative expression shaped Angela’s ability to seamlessly integrate form and function in her work.