


Creating an inviting and visually appealing charcuterie board often begins with the artful arrangement of meats, fruits, nuts, and cheeses. Cheese, being a quintessential element, requires special attention not only for its taste profiles but also for its presentation.
Knowing how to cut cheese properly enhances the overall aesthetic and makes it more enjoyable to eat, ensuring that the flavors are preserved and the textures are highlighted.
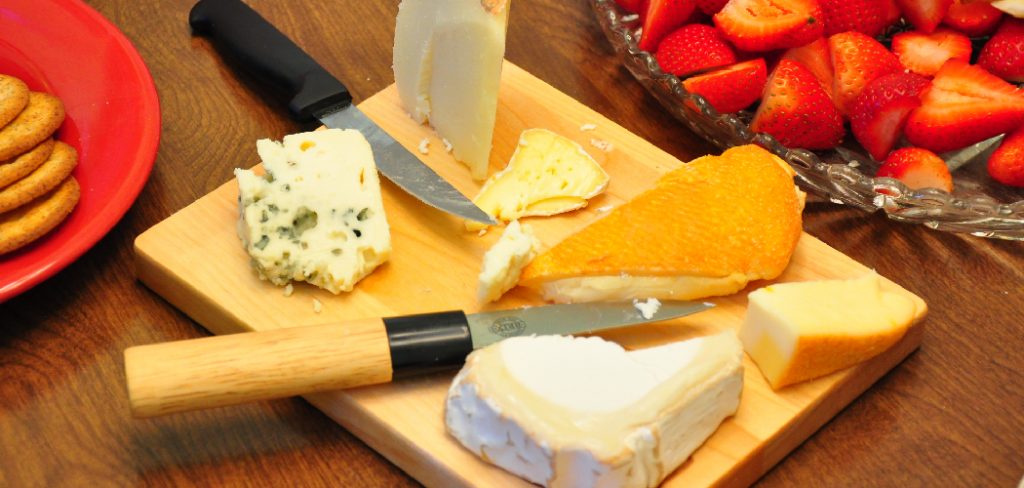
Whether you’re serving a creamy Brie or a robust aged cheddar, understanding the different types of cuts will elevate your charcuterie board from simple to sophisticated. In his blog post on how to cut cheese for charcuterie board, renowned cheese expert Max McCalman shares his expertise on the topic.
Needed Tools and Equipment
Before we dive into the cutting techniques, make sure to have these essential tools on hand:
A Sharp Knife:
This is crucial for clean and precise cuts that don’t leave jagged edges or crumbled pieces. A sharp knife also allows for better control when cutting through different types of cheese.
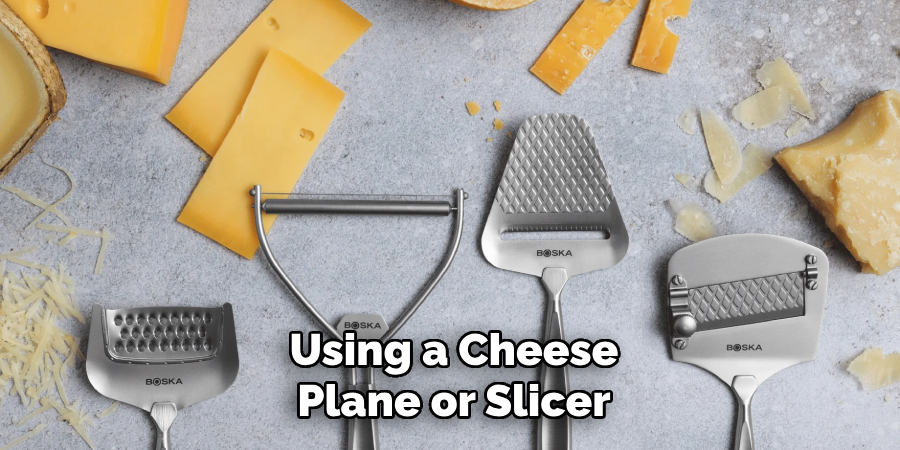
A Cheese Plane or Slicer:
A cheese plane or slicer is ideal for softer cheeses like Brie, Camembert, and goat cheese. It creates thin and even slices without disturbing the delicate texture of these cheeses.
A Cheese Wire:
A cheese wire is a thin wire that can be used to create neat and uniform slices of harder cheeses like cheddar, gouda, and parmesan. It’s especially handy when dealing with crumbly aged cheeses.
Cutting Board:
Choose a sturdy and clean cutting board with enough space to comfortably cut your chosen variety of cheeses without overcrowding them.
Cheese Paper or Parchment Paper:
After you’re done cutting the cheese, wrap the remaining pieces in cheese paper or parchment paper to maintain their freshness and prevent them from drying out.
8 Step-by-step Guidelines on How to Cut Cheese for Charcuterie Board
Step 1: Choose the Right Cheese
The first step in creating an extraordinary charcuterie board starts with selecting the right variety of cheeses. Aim for a diverse selection to cater to different taste preferences and provide a range of textures and flavors. Consider a mix of soft, semi-soft, hard, and blue cheeses. Soft cheeses like Brie or Camembert add creaminess, semi-soft cheeses like Havarti or Gouda offer a milder flavor, while hard cheeses such as Cheddar or Parmesan provide a robust, sharp taste.

Don’t forget to include a blue cheese, like Roquefort or Gorgonzola, for depth and a touch of adventurous flavor. By choosing a well-rounded assortment, you set the foundation for an enticing and delightful charcuterie board experience.
Step 2: Pull the Cheese Out of the Fridge Early
To enhance the flavor and texture of each cheese, it’s important to let them sit at room temperature before cutting and serving. Pull the cheese out of the refrigerator approximately 30 to 60 minutes prior to your event. This allows the cheese to soften naturally, which melds and accentuates its flavors, providing a more pleasurable tasting experience.
Warmer cheese also makes for easier cutting, as it reduces the risk of crumbling or breaking, especially with softer varieties. By allowing the cheese to reach room temperature, you’re ensuring that each bite delivers its optimal taste and texture profile.
Step 3: Separate Each Cheese on the Cutting Board
To avoid cross-contamination and preserve the unique qualities of each cheese, it’s essential to separate them properly on the cutting board. Make sure there is enough space between each variety, so they don’t touch or mix flavors. You can also use different cutting boards for each type of cheese if you have enough available.
The separation of each cheese also allows you to plan the layout and arrangement of your charcuterie board, ensuring there’s enough room for other elements like meats, fruits, and nuts.
Step 4: Cut Soft Cheeses into Wedges
For soft cheeses like Brie or goat cheese, use a sharp knife to cut them into wedges. Start by slicing the wheel in half horizontally through the center. Then, cut each half into smaller wedges by making vertical cuts from the rind all the way to the center. This creates triangular slices that are perfect for spreading onto crackers or bread.
If you’re using a cheese plane or slicer, gently drag it across the surface of the cheese to create thin and even slices. Be careful not to press too hard, as this could cause the cheese to crumble.
Step 5: Use a Cheese Wire for Hard Cheeses
To cut harder cheeses like cheddar or parmesan, use a cheese wire or thin kitchen string. Place the wire under the cheese and pull it up through in one swift motion. This will create an even slice without putting pressure on the cheese and causing it to break.
Alternatively, you can also use a sharp knife to cut these cheeses into small cubes or chunks. Just make sure to apply gentle pressure while cutting to prevent crumbling.
Step 6: Slice Semi-Soft Cheeses into Rectangles
Semi-soft cheeses like Havarti or Gouda can be cut into rectangular slices for a more uniform presentation. Start by slicing the cheese wheel in half horizontally and then make vertical cuts to create long rectangles. These are perfect for stacking on crackers or layering with meats and fruits on your charcuterie board.
It’s also important to note that some semi-soft cheeses, like Swiss or Emmental, have holes known as “eyes.” When cutting these types of cheese, make sure to cut around the holes for a clean and appealing presentation.
Step 7: Cut Blue Cheese into Small Wedges
Blue cheeses typically come in large wheels or blocks and can be difficult to cut into uniform slices. The best way to serve them is by slicing them into smaller wedges. Use a sharp knife to create triangular slices starting from the edge of the wheel towards the center.

If you prefer a smoother texture, you can also crumble blue cheese onto your charcuterie board instead of cutting it into wedges.
Step 8: Arrange the Cheese on the Charcuterie Board
After cutting each cheese according to its type and texture, it’s time to arrange them on your charcuterie board. Start by placing larger pieces of cheese first, followed by smaller slices or cubes. This will create a visually appealing display that also allows for easy access to each type of cheese.
You can also add some garnishes like fresh herbs, honey, or jams around the cheeses for added flavor and decoration. Don’t forget to leave some space between different types of cheeses to avoid mixing flavors and textures.
With these simple step-by-step guidelines on how to cut cheese for charcuterie board, you’ll be able to confidently cut and arrange a variety of cheeses for a delicious and impressive spread. Remember to use high-quality knives and cheese tools, and always serve the cheese at room temperature for the best possible taste experience.
Frequently Asked Questions
Q: Can I Use Pre-sliced Cheese for My Charcuterie Board?
A: While pre-sliced cheese may be convenient, it’s always best to cut and arrange fresh cheese on your charcuterie board. This allows for optimal flavor and texture, as well as the ability to customize the size and shape of each cheese.
Q: How Do I Prevent Cheese from Sticking to My Knife?
A: To prevent cheese from sticking to your knife, make sure the blade is clean and dry before cutting. You can also try using a bit of cooking spray or butter on the blade to create a non-stick surface.
Q: Can I Cut Different Types of Cheese with the Same Knife?
A: It’s generally recommended to use a separate knife for each type of cheese to avoid mixing flavors and preserving the unique characteristics of each cheese. However, if you don’t have multiple knives available, make sure to thoroughly clean and dry the blade between cutting different types of cheeses. Additionally, using a cheese wire or slicer for harder cheeses can help prevent cross-contamination.

Bonus Tip: Try Different Types of Knives
While a sharp chef’s knife may work well for most types of cheese, you can also try using specialty cheese knives for specific varieties. For example, a curved cheese knife is perfect for cutting soft, crumbly cheeses, while a cheese cleaver is ideal for slicing hard cheeses into thick chunks. Experiment with different types of knives to find the best method for each type of cheese on your charcuterie board.
Conclusion
Creating a memorable charcuterie board is an art that blends flavor, texture, and presentation. By carefully selecting a diverse range of cheeses and cutting them appropriately, you ensure a delightful experience for your guests. The thoughtful organization of cheeses—paired with complementary elements such as meats, fruits, and nuts—enhances both the visual appeal and the tasting sensation.
Follow these steps on how to cut cheese for charcuterie board to transform any gathering into a culinary celebration, inviting your guests to savor each bite while appreciating the harmonious balance of exquisite flavors. Remember, the key to a successful charcuterie board lies in the details, from cheese selection to how it’s served, making every occasion special.
Professional Focus
Angela Ervin, a former interior designer turned blogger, specializes in kitchen design and renovations. Through her website, she blends her passion for cooking with design expertise, sharing practical and creative ideas. Known for balancing functionality and beauty, Angela’s insightful content has made her a trusted voice in home design and lifestyle.
About the Author
Angela Ervin, an experienced interior designer and blogger, combines her passion for kitchen renovations with storytelling. Living in Petersburg with her family, she enjoys cooking and testing her projects firsthand. Known for her humor and relatable style, Angela shares creative, functional design insights through her content, making her a trusted voice in home design.
Education History
University: Virginia Commonwealth University
Degree: Bachelor of Fine Arts (BFA) in Interior Design
- Angela’s education at VCU focused on mastering core interior design principles, including spatial planning, color theory, materials selection, and sustainable design practices.
- She gained hands-on experience through studio projects and collaborative design exercises, which honed her ability to create functional and aesthetically pleasing environments.
- Her coursework also emphasized problem-solving and practical applications of design, preparing her for real-world projects like her self-directed kitchen renovations.
- The program’s strong foundation in both technical skills and creative expression shaped Angela’s ability to seamlessly integrate form and function in her work.