


Keeping your kitchen appliances clean and dust-free can be a challenge, especially when they’re not in frequent use. One effective way to protect and maintain the appearance of your kitchen gadgets is by using appliance covers. Not only do these covers shield appliances from dirt and grime, but they also add a touch of style and personalization to your kitchen decor.
In this guide on how to make covers for kitchen appliances, we will walk you through the process of making your own custom covers for various kitchen appliances, offering practical tips and creative ideas to match any kitchen theme. Whether you’re a seasoned seamstress or a beginner, you’ll find the inspiration and instructions needed to create beautiful, functional covers.
What is an Appliance Cover?
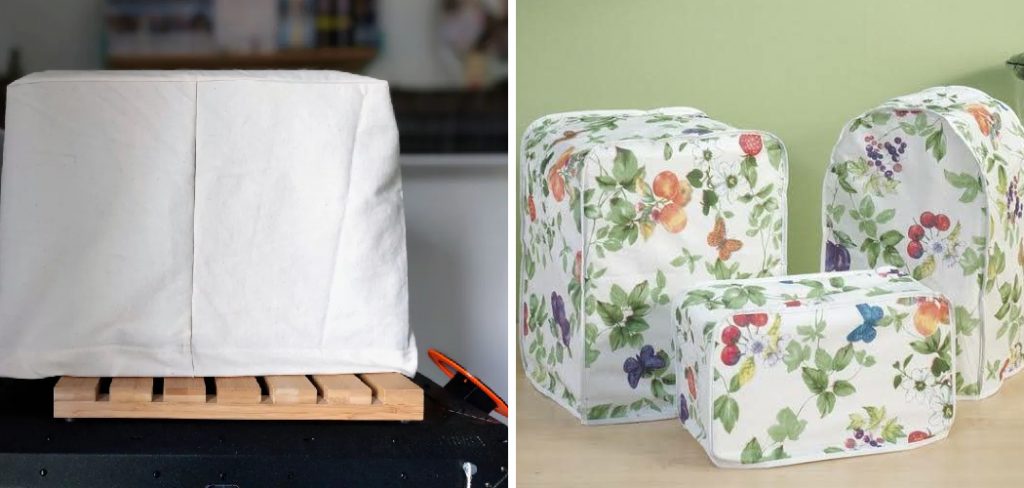
An appliance cover is a protective fabric or material designed to fit over kitchen appliances such as blenders, toasters, microwaves, and mixers. These covers help protect your appliances from dust, grease, and other kitchen grime when they are not in use. They serve not only a practical purpose in maintaining the cleanliness and longevity of your appliances but also offer an opportunity to enhance the aesthetic appeal of your kitchen.
Appliance covers can be customized in various styles, colors, and patterns to seamlessly integrate with your kitchen’s decor, allowing you to express your personal style while keeping your appliances in top condition.
Materials Needed
To make your own appliance covers, you will need the following materials:
- Fabric of Your Choice (Cotton or Linen Are Recommended for Their Durability and Ease of Washing)
- Measuring Tape
- Scissors
- Sewing Machine or Needle and Thread
- Pins
- Iron and Ironing Board
- Embellishments (Optional)
8 Step-by-step Guides on How to Make Covers for Kitchen Appliances
Step 1: Measure Your Appliance
Begin by accurately measuring the dimensions of the appliance you wish to cover. Use your measuring tape to determine the height, width, and depth of the appliance. It’s important to add an extra inch to each measurement to account for seam allowances and a comfortable fit over the appliance.

Carefully record these measurements as they will guide the cutting of your fabric. Ensuring precise measurements will help achieve a snug and aesthetically pleasing cover that fits your appliance perfectly.
Step 2: Choose Your Fabric and Pattern
Selecting the right fabric and pattern is crucial in crafting appliance covers that not only fit well but also complement your kitchen decor. Opt for durable fabrics such as cotton or linen, as they are easy to wash and maintain. When choosing a pattern, consider the existing color scheme and style of your kitchen. Whether you prefer a solid color for a minimalistic look or vibrant prints for a more lively feel, ensure that your choice aligns with the aesthetic you wish to achieve.
If you’re feeling adventurous, experiment with different textures and embellishments to add an extra layer of interest to your covers. Remember, the fabric and pattern you select will set the tone for your final product, so choose wisely to create a cohesive and visually appealing design.
Step 3: Cut Your Fabric
Using your recorded measurements, cut the fabric according to the dimensions of your appliance. It’s best to mark and measure twice before making any cuts to ensure accuracy. If using a patterned fabric, make sure that the pattern lines up and is centered on each panel for a professional finish.

The fabric should be cut into six panels, with two pieces for the front and back, two for the sides, and one for the top and bottom. Finally, cut a long strip of fabric that will serve as the cover’s binding. The width of this strip should be twice the height of your appliance, plus an extra inch to account for seam allowances.
Step 4: Sewing Your Panels
Take the two front panels and sew them together along one side using a 0.5-inch seam allowance. Repeat this process with your back panels.
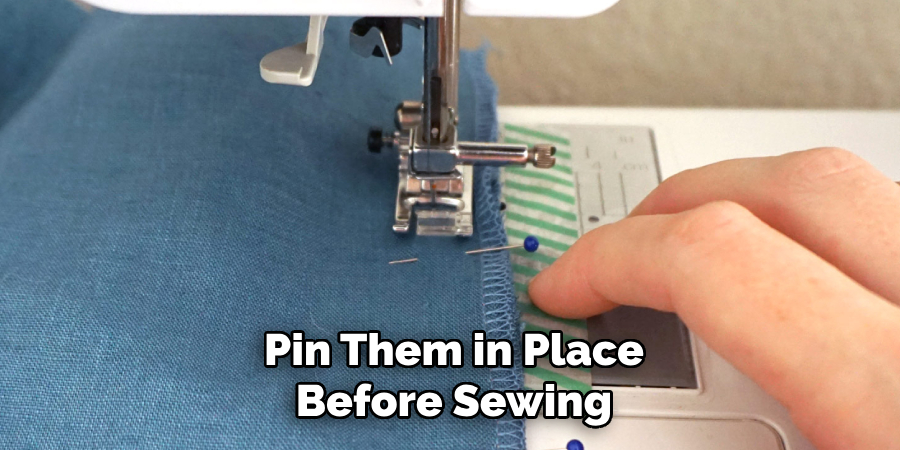
Next, attach each side panel to its respective front or back panel using pins to secure them in place before sewing. Make sure to leave an opening on each side panel to serve as a handle for removing and placing the cover onto the appliance.
Step 5: Sewing the Top and Bottom Panels
Take your top and bottom panels, fold over one edge by half an inch, then iron it down to create a crisp seam. Place these panels on top of your appliance cover’s main body, with the folded edges facing toward the center. Pin them in place before sewing them together using a 0.5-inch seam allowance.
You should now have three sides of your cover sewn together, with an opening on each side panel and the top and bottom panels attached.
Step 6: Finishing the Cover
Turn your appliance cover inside out to reveal the clean seams. To give your cover a more polished look, use a zig-zag stitch along all raw edges to prevent fraying. Lastly, attach the binding strip around the bottom edge of the cover using pins to keep it in place before sewing.
The binding strip should cover the raw edges and create a neat finish on the bottom of your cover.
Step 7: Adding Embellishments (Optional)
If you want to personalize your appliance cover further, consider adding embellishments such as buttons, embroidery, or appliqué. Start by sketching your desired design on paper determining where the embellishments will be placed. Once you have a clear plan, carefully sew or attach each embellishment to the correct area on the cover. For embroidery, use a hoop to keep your fabric taut, ensuring precise stitching.
Appliqué can be secured with fabric glue or sewn around the edges with a zig-zag stitch. Buttons can be purely decorative or used to create functional features like closures or flaps. These finishing touches allow you to express your personal style, making each cover truly unique to your kitchen décor.
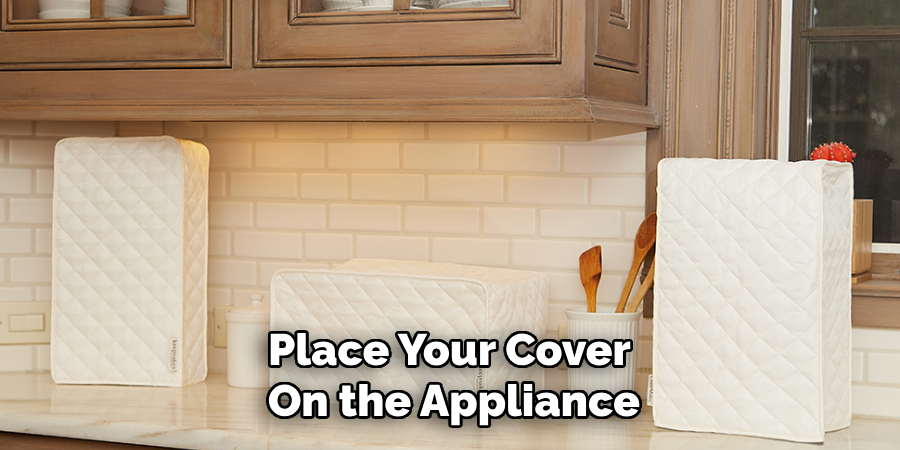
Step 8: Place Your Cover on the Appliance
Now that your cover is complete, it’s time to slide it onto your appliance. Start by placing the top and bottom panels over the appliance, then gently pull down the sides and secure them under the appliance with clips or pins. Adjust as needed for a snug fit, and enjoy your new custom-made appliance cover!
Following these step-by-step guides on how to make covers for kitchen appliances will enable you to create covers for your kitchen appliances that not only protect them from dust and grime but also add a touch of style to your space. With the right materials, measurements, and sewing skills, you can easily make personalized covers for all your kitchen appliances and transform the look of your kitchen in no time. Happy crafting!
Tips for Maintaining Your Appliance Covers
- Wash your covers regularly to keep them clean and fresh.
- Use a gentle detergent and cold water when washing to prevent shrinking or fading.
- Avoid using bleach or harsh chemicals as they can damage the fabric.
- If possible, air dry your covers instead of using a dryer to maintain their shape and avoid shrinking.
- Store your covers in a cool, dry place when not in use to prevent discoloration or mildew growth.
By following these simple maintenance tips, you can ensure that your appliance covers stay in good condition for years to come. With proper care, your custom-made covers will continue to protect your appliances and add a touch of style to your kitchen.
Frequently Asked Questions
Q: Can I Use Any Fabric for Making Appliance Covers?
A: It’s best to use durable fabrics such as cotton or linen, but you can also experiment with other materials like canvas or denim if desired. Just make sure the fabric is suitable for washing and can withstand the weight of your appliance.
Q: Can I Make Covers for Different Sizes of Appliances?
A: Yes, by following the same steps and adjusting your measurements accordingly, you can make covers for any size or shape of kitchen appliance. Just make sure to take accurate measurements for a perfect fit.
Q: Do I Need to Be an Experienced Sewer to Make Appliance Covers?
A: While some sewing skills are required, this project is suitable for beginners as well. Take your time, follow the instructions carefully, and don’t be afraid to ask for help if needed. Before you know it, you’ll have a beautiful custom-made cover for your kitchen appliances!
Conclusion
Creating custom appliance covers is a rewarding project that combines practicality with creativity. By following the detailed steps on how to make covers for kitchen appliances outlined above, you can design and construct personalized covers that protect your kitchen appliances while adding a unique touch to your cooking space. Equipped with the right materials and techniques, even beginners can master this process and enjoy the satisfaction of crafting something both beautiful and functional.
Remember to choose fabrics and embellishments that reflect your style and complement your kitchen décor. With regular maintenance, your handmade covers will remain a charming addition to your home for years to come, proving that a little effort can go a long way in enhancing your living environment. Happy crafting!
Professional Focus
Angela Ervin, a former interior designer turned blogger, specializes in kitchen design and renovations. Through her website, she blends her passion for cooking with design expertise, sharing practical and creative ideas. Known for balancing functionality and beauty, Angela’s insightful content has made her a trusted voice in home design and lifestyle.
About the Author
Angela Ervin, an experienced interior designer and blogger, combines her passion for kitchen renovations with storytelling. Living in Petersburg with her family, she enjoys cooking and testing her projects firsthand. Known for her humor and relatable style, Angela shares creative, functional design insights through her content, making her a trusted voice in home design.
Education History
University: Virginia Commonwealth University
Degree: Bachelor of Fine Arts (BFA) in Interior Design
- Angela’s education at VCU focused on mastering core interior design principles, including spatial planning, color theory, materials selection, and sustainable design practices.
- She gained hands-on experience through studio projects and collaborative design exercises, which honed her ability to create functional and aesthetically pleasing environments.
- Her coursework also emphasized problem-solving and practical applications of design, preparing her for real-world projects like her self-directed kitchen renovations.
- The program’s strong foundation in both technical skills and creative expression shaped Angela’s ability to seamlessly integrate form and function in her work.