


Removing the doors of a Samsung refrigerator can be a necessary step for various reasons, such as fitting the appliance through tight spaces during a move or performing maintenance tasks.
While the process may seem daunting, following a structured guide can simplify the task significantly.
This document provides a step-by-step approach on how to take samsung fridge doors off to help you safely and efficiently remove the doors of your Samsung fridge, ensuring that the process is straightforward and damage-free. Before you begin, make sure you have the necessary tools on hand and some help if needed, as the doors can be heavy and unwieldy.
Why Do You Need to Take Samsung Fridge Doors Off?
The most common reasons for wanting to remove the doors of a Samsung fridge include moving, cleaning, or replacing parts.
If you are moving and have a narrow doorway or hallway, taking the doors off can make it easier to maneuver the appliance through tight spaces. Similarly, cleaning behind and underneath the fridge is much more accessible with the doors removed. In some cases, removing the doors may also be necessary when replacing damaged or broken parts.
It is worth noting that while removing the doors may seem like a simple task, it requires some careful planning and execution to avoid damaging the appliance. Hence, following the recommended steps in this guide is essential.
Tools Required

Before beginning the process of taking off your Samsung fridge doors, ensure you have the following tools on hand:
- Phillips Head Screwdriver or Drill With a Phillips Head Attachment
- Flathead Screwdriver
- 1/4 Inch Hex-head Wrench (Included With Most Samsung Fridges)
- Towels or Soft Cloth
- Someone to Assist in Lifting and Holding the Doors
10 Step-by-step Guides on How to Take Samsung Fridge Doors Off
Step 1: Unplug the Fridge
Safety should always be your first priority when performing any maintenance tasks on electrical appliances. Before you begin the process of removing the doors from your Samsung fridge, ensure that the appliance is unplugged from the power outlet. This step not only protects you from electric shock but also prevents any potential damage to the refrigerator’s electrical components.
Locate the power cord at the back of the fridge and carefully disconnect it from the outlet. If your fridge has a water supply line, you should also shut off the water supply to avoid any leaks during the process.
Step 2: Empty the Fridge and Freezer Contents
Before proceeding with the door removal, it’s essential to empty all the contents from both the fridge and freezer compartments. This step not only makes the doors lighter and easier to handle but also prevents any spills or damage to your food items.

Begin by removing all perishable items, such as fruits, vegetables, dairy, and meats, and place them in a cooler or insulated bags to keep them fresh. Next, take out all containers, shelves, and bins from both compartments.
This will also give you an opportunity to clean these components if needed. Ensure that the fridge and freezer are completely empty before moving on to the next step to ensure safety and ease during the door removal process.
Step 3: Remove the Top Hinge Cover
With the fridge unplugged and all contents removed, the next step is to remove the top hinge covers from the doors.
The hinge covers are typically located at the top of the refrigerator doors and are held in place by screws. Using your Phillips head screwdriver or drill with a Phillips head attachment, carefully unscrew and set aside the screws that secure the hinge covers.
Once the screws are removed, gently lift off the hinge covers to expose the hinge assembly beneath. It’s a good idea to keep the screws and hinge covers in a safe place where they won’t get lost, as you will need them when reassembling the fridge.
Be mindful of the wiring and connectors that may be attached to the hinge covers, especially if your fridge has features like water dispensers or digital displays. Carefully disconnect any visible wire connectors to ensure they don’t get damaged during the door removal process.
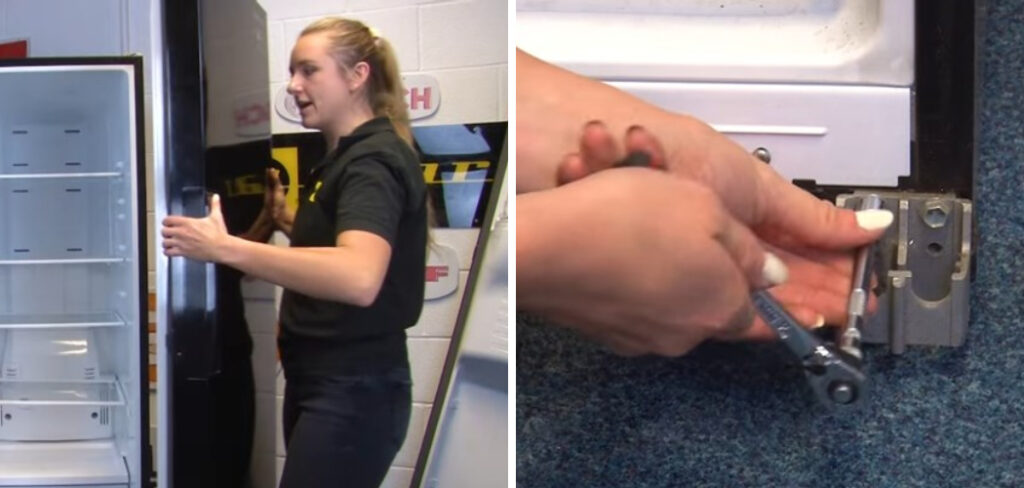
Step 4: Remove the Top Hinge Screws
With the hinge covers removed, you can now access the top hinge screws that hold the doors in place. Use your 1/4-inch hex-head wrench to unscrew and remove these screws from both doors. It’s essential to have someone assist you with holding the door while removing these screws to prevent it from falling and causing damage.
Once all screws are removed, carefully lift and detach the top hinge from the fridge’s body, ensuring that no wires or connectors get damaged in the process. Set aside any screws or attachments associated with the hinge for later use.

Step 5: Lift and Remove the Doors
With the top hinge screws and hinges removed, you are now ready to lift and remove the doors. This step will require assistance due to the weight and size of the doors.
Carefully grip the door and slowly lift it upwards to release it from the bottom hinge. If your Samsung fridge has a water or electrical connection running through the door, be cautious and ensure all connections are properly disconnected before lifting.
Have your assistant help hold and stabilize the door as you lift it free from the lower hinge assembly.
Once the door is completely detached, place it on a towel or soft cloth to prevent any scratches or damage. Repeat the process for the other door, ensuring both doors are safely set aside.
Step 6: Remove the Bottom Hinge Assembly
With the doors removed, you can now access and remove the bottom hinge assembly. This step is necessary if you need to replace any parts or clean the fridge.
Using your Phillips head screwdriver or drill with a Phillips head attachment, remove the screws that hold the bottom hinge in place. Set these aside for later use.
Once all screws are removed, carefully lift off the bottom hinge assembly from the fridge’s body. Inspect and clean any debris or residue on the assembly before setting it aside.
Step 7: Clean Behind and Underneath the Fridge
With the doors and bottom hinge assembly removed, this is an excellent opportunity to clean behind and underneath your Samsung fridge. Over time, dust, dirt, and debris can accumulate in these areas, potentially affecting the appliance’s performance and hygiene.

Start by using a vacuum cleaner with a brush attachment to remove any loose dust and dirt from the floor and walls behind the fridge. Pay special attention to the coils and other components that may have accumulated dust, as this can impact the refrigerator’s efficiency.
After vacuuming, use a damp cloth with a mild cleaning solution to wipe down the surfaces. Be cautious around any wires or connectors to avoid causing any damage. Finally, use a dry cloth to wipe away any excess moisture.
Step 8: Reinstall the Bottom Hinge Assembly
To begin reassembling your Samsung fridge, start by reinstalling the bottom hinge assembly.
Position the bottom hinge back in its original location on the fridge’s body, ensuring that it aligns correctly with the mounting holes. Using your Phillips head screwdriver or drill with a Phillips head attachment, reinsert and tighten the screws to secure the bottom hinge in place.
Make sure the hinge is firmly attached and does not wobble, which could cause misalignment issues when you reattach the doors.
This step is crucial for maintaining the smooth operation and stability of the doors. Once the bottom hinge assembly is securely in place, you are ready to proceed to the next step, which involves reattaching the doors.
Step 9: Reattach the Doors
With the bottom hinge assembly reinstalled, it’s time to reattach the doors. Start by carefully aligning and inserting the top hinge into its original location on the fridge’s body.
Have your assistant hold and stabilize the door as you use your 1/4-inch hex-head wrench to tighten and secure the screws.
Ensure that all connections are properly attached before proceeding to attach the other door in a similar fashion.
After both doors are securely attached, gently open and close them to ensure proper alignment and smooth operation. If everything looks good, you can now proceed to reinstall the top hinge covers and any other attachments, such as water or electrical connections.
Step 10: Power Up and Test
Your Samsung fridge is now fully reassembled and ready to be powered up. Before plugging it back in, make sure all attachments and components are properly connected and secured.
Once everything is in place, plug the fridge back in and turn on the power. Allow a few minutes for the appliance to start up before testing its functions, such as cooling and water dispensing.
Following these steps on how to take samsung fridge doors off should allow you to successfully remove and reinstall the doors on your Samsung fridge. Remember to always take precautions, such as having an assistant help with heavy parts and being mindful of wires and connectors, to avoid any accidents or damage. Regularly cleaning and maintaining your fridge can extend its lifespan and ensure optimal performance for years to come.
Conclusion
Maintaining your Samsung fridge by periodically removing and cleaning behind the doors not only ensures the appliance’s efficiency but also extends its lifespan.
By following a systematic approach, as outlined in this guide on how to take samsung fridge doors off, you can safely and effectively take off and reattach the doors without causing any damage.
Enlisting the help of an assistant, being cautious with electrical connections, and keeping track of all screws and components are key steps in the process. Regular upkeep and mindful handling during maintenance tasks can keep your refrigerator running smoothly, preserving its functionality and hygiene for years to come.
Professional Focus
Angela Ervin, a former interior designer turned blogger, specializes in kitchen design and renovations. Through her website, she blends her passion for cooking with design expertise, sharing practical and creative ideas. Known for balancing functionality and beauty, Angela’s insightful content has made her a trusted voice in home design and lifestyle.
About the Author
Angela Ervin, an experienced interior designer and blogger, combines her passion for kitchen renovations with storytelling. Living in Petersburg with her family, she enjoys cooking and testing her projects firsthand. Known for her humor and relatable style, Angela shares creative, functional design insights through her content, making her a trusted voice in home design.
Education History
University: Virginia Commonwealth University
Degree: Bachelor of Fine Arts (BFA) in Interior Design
- Angela’s education at VCU focused on mastering core interior design principles, including spatial planning, color theory, materials selection, and sustainable design practices.
- She gained hands-on experience through studio projects and collaborative design exercises, which honed her ability to create functional and aesthetically pleasing environments.
- Her coursework also emphasized problem-solving and practical applications of design, preparing her for real-world projects like her self-directed kitchen renovations.
- The program’s strong foundation in both technical skills and creative expression shaped Angela’s ability to seamlessly integrate form and function in her work.